

I've now painted and installed quite a few murals on canvas, rather than just painting them directly on the wall. This method has some great attributes - the artist can work off-site, the client is only bothered for a day or even just for a few hours, and should the client (or you!) move and want to take the mural along it's a cinch to pull off the wall (with a little effort, but it'll come off I promise).
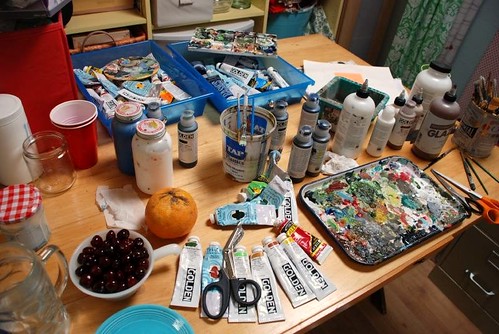
Materials you'll need:
-canvas to paint your mural on
-scissors or rotary cutter, mat, & ruler (for trimming mural)
-clay based wallpaper adhesive (available at many paint stores - this is the thick, opaque stuff)
-paint tray (I line mine with a spare plastic bag taped around the back, or you can use foil)
-paint roller and roller cover (I like ones that can hold a lot - look for "rough surface" variety)
-low tack tape (for holding mural in place - lightweight applications only)
-brayer
-staple gun (for tacking mural in place in heavyweight applications)
-razor blade or x-acto knife
-cloth rags & water (keep a damp rag tucked in your back pocket - so helpful for wiping off excess adhesive!)
-paintbrush for touch ups (along with paint to match)
-dropcloths
Here's how to do it:
Select a medium to heavy weight canvas. I prefer a pre-primed canvas as it saves the step of applying gesso.
Measure and trim your canvas to the size or shape you need. I think it's a good idea to leave some extra room on the sides - a place to dab your paintbrush, or add to once installed if your measurements were a little off.
Sketch out your mural scene:

Paint away!

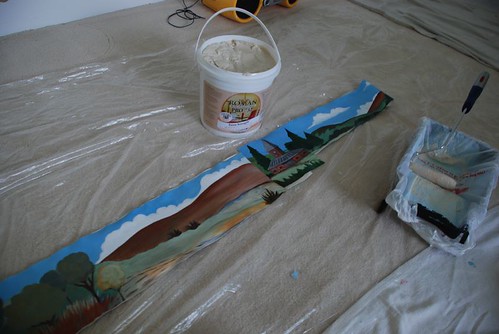
Trim your piece (you can wait to do this if you're unsure of exact dimensions). If you're trimming straight lines like I was (104+ feet of straight lines), I recommend using a rotary cutter with a straight edge and self-healing mat. The work will go much faster.
Be careful! Those rotary cutters can really bite. I know this well :o(

When you're all set to install take a minute to get your work area prepped. Have all your tools on hand, drop cloths down, mural(s) placed in front of where they're to be put up. If you like, tape your mural in place to see what you have to work with (keeping in mind the size may change slightly after applying adhesive - see my story below).

Pour the adhesive into a paint tray. Then using a roller (small or large depending on your mural size - I used a 4" roller for this one), apply a consistent and fairly thick layer of adhesive to the back of the canvas.
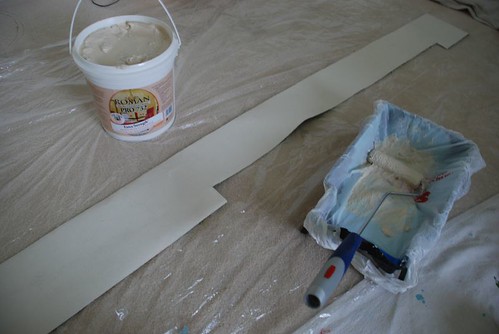
Fold the ends of the canvas in to meet in the middle. This is called "booking" and it allows the adhesive to set up.
While the adhesive is setting up on the canvas, quickly roll the area of the wall the mural is going on with the same adhesive (a nice even layer, not too thin).

You have a few minutes...but try not to take too long. You can always apply a little more adhesive as you're putting the canvas up but it's easier just to move along briskly.
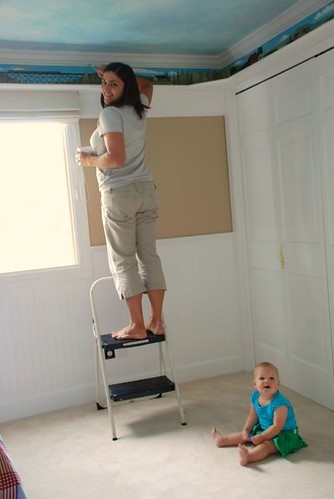
Showtime! (It can be helpful to have a second pair of hands for this...I didn't for this mural but it went okay. Anything bigger and you'll find it gets unwieldy.) Pick up your canvas, unfold one end and press it in place starting from the top. Move your free hand along the canvas, pushing it against the wall and sliding it somewhat (it'll have some wiggle room) the direction you want it to go. Unfold the other half of the canvas and press it into place as well. If you're working with a very heavy canvas, or if your canvas is very large, it may need extra help in attaching. If that's the case, have your staple gun handy and drive a few staples in (at the top) to hold it in place. You can paint over these staples once you're all finished installing.
When the canvas is where you want it, pull out your brayer and begin to roll it along the surface moving from the center out to the sides. This will push out all the air bubbles. Sliding your hands along the canvas (center out) is very effective too.

The wonderful thing about the clay based wallpaper adhesive is that as it dries it pulls the canvas into the wall making it like one solid surface. It really is amazing.
When your mural is attached to the wall you can then assess your touch ups. Maybe you have a little gap here or there (if you were fitting it into a niche maybe) - simply fill with matching paint. Maybe you have some overhanging canvas - trim it neatly with a razor blade or very sharp mat knife (x-acto blade, etc.). Many of my clients have chosen to frame out the mural and have installed molding around the edges (overlapping the edges) - a beautiful finish. Or maybe (like in my case over the weekend) your canvas surprises you and shrinks once you apply the adhesive (!) and you come up short on all sides. What I ended up doing (instead of freaking out) was filling in my gaps with paint to match. I feel like there's always a way to rescue things - that's totally my motto!
That's it! You're done! You can always add more paint on top if you desire.

Have fun :o) Hope this is helpful to some of you out there! And of course, let me know if you have any questions.
xo, dh
2 comments:
I am so glad you posted this! It's amazing!!!! Beautiful work. I've been curious about this process for years. The mural I did for my son is painted directly on the wall, unfortunately. He'll grow out of it soon and it would break my heart to paint over it. I think it would be easier to move and not know what happened to it.
Thanks Laura! Now I'm curious of course...what did you paint in your son's room?
Post a Comment